You may remember how I blogged about how much I was loving my new SodaStream machine at the end of last year. Well, it's been a lifesaver through these hot summer months, and we've had fun creating lots of delicious drinks. I especially love SodaStream Free, which is a range of fruit flavoured concentrates that contain only a fraction of the calories and sugar of other regular soft drinks.
Dael & I spent this morning putting together some of our favourite healthy hydration creations using fresh fruit, mint (fantastic in drinks), lots of ice, and SodaStream Free caps. Let me tell you, our little studio was smelling divine, and we were set for drinks for the rest of the day.
The first we called "Apple-Peach Pick Me Up". We start all our drinks with lots of ice; then we filled a mason jar cup with diced peaches, nectarines, and watermelon, slices of lemon, and fresh mint leaves; and topped with Apple-Peach SodaStream. The sweet, zingy taste had us feeling energised and ready for the day.
This pretty little number is "Green Tea-Lychee Twist". The SodaStream Green Tea-Lychee flavour is divine on it's own - light and fresh, a real thirst quencher - so we kept it simple with some ice, watermelon and a slice of lemon on the side. This would be great on a hot afternoon with your girlfriends.
My personal fave is our "Fresh Lemon-Licious". Combine lots of ice, fresh mint, lemon slices and SodaStream Fresh Lemon to make the perfect summer cooler.
To find out more about SodaStream NZ visit their website and Facebook page, and have fun coming up with your own yummy recipes.
Last week I introduced you to the amazing photo print app, HappyMoose. I speak from experience when I say that the app is extremely user-friendly, and the products are excellent. At this stage the app is available for iPhones, but very soon it will be available for web and Android, so follow on Facebook for updates.
This week we're giving away $30 vouchers to three lucky Cush & Nooks readers. All you have to do is "like" the HappyMoose Facebook page to enter, and email me to let me know you've done so. For an extra entry, "like" this post on my Facebook page. The competition closes at 3pm this Friday 27th February. The winners will be notified by email and announced on my Facebook page.
The winners will be able to use their coupon to purchase from the great range of products - wall dots, canvases, and wood blocks - all in a range of sizes. Make sure you read my last post for all of the details. Download the HappyMoose app from the app store and start printing those memories! Good luck!
You may've noticed that I'm no longer blogging every day. With my interior design business, Bibby + Brady, growing and getting busier and busier, I had been struggling to keep with five blog posts a week. I've decided it's a much better idea to do three quality posts a week - Monday, Wednesday and Friday - where I will share with you Bibby + Brady jobs we're working on, as well as fabulous new products and businesses, and my favourite interior inspiration.
Today is the first in a series of posts on my own kitchen/dining/laundry reno, and I hope you follow me on the journey from demolition to dream finish! This is what I'm living with at the moment - some walls have already been taken back to the framing; old lino ripped up; some cupboards have been ripped out and the pantry relocated before it goes for good.
The old pantry has been moved down to this corner (below) temporarily. The hot water cylinder will be removed, as we're going to have a gas hot water system installed, and a set of bi-fold cupboards will be built to house our laundry and provide extra storage. The laundry is currently in our kitchen, and by moving it we get more precious storage in the kitchen. We used to have a set of industrial lockers in this corner of the dining room, and they have been moved out to our garage to make room for the new laundry cupboard.
We recently had a new round dining room table made in American oak, and we LOVE this! The old chairs will be sold, and in the corner of the dining room we're having an L-shaped booth seat custom made with internal storage. Three new chairs will be added around this side of the table, which means we will be able to fit lots of family and friends around it.

The fridge will be replaced by a double fridge and moves to where the laundry currently is. This is on the outskirts of the kitchen which means when the kids are popping in and out of the fridge (which they seem to do a lot!) they won't have to come right into the kitchen and get under my feet. Wall hung cupboards will be added right to the ceiling with the range hood concealed in one and down lighting added underneath for task lighting. A new oven and cooktop will be installed in the same place as the old oven (which helps with electrics not having to move). On the left hand side will be bi-fold cupboards, a tall pull-out pantry, and the fridge.
Here's another view of where the fridge and pull-out pantry will be. To the left is our back door.
The bench will be extended slightly and will have open shelves and a cupboard on the dining room side to utilise as much of the cupboard space as possible. Storage is key for me as I've lived with this kitchen and it's lack of cupboard space for 10 years. The bar stools will go, as we have plenty of seating around the dining room table. The floor boards will be sanded and polished.
To give you an idea of the look I'm going for, here are some of my inspirational pics. My husband wanted an all white kitchen, so I have found clever ways to incorporate texture to avoid it looking too clinical. I love the contemporary take on an old look achieved by simple wainscoting or wood panelling. Darren and Dee used it beautifully in their Block Glasshouse apartment. To add to the clean look I'm opting for handleless drawers.
There will be touches of wood including an open shelf made from our old mantelpiece.
I have my heart set on a matt black stone sink and a matt black (or even copper!) tap.
The splash back behind the oven will features some gorgeous tiles. I'm hoping for small marble hexagon tiles to bring some more texture and subtle colour to the white room.
Michael and Carlene's kitchen (yes, I was a fan of The Block Glasshouse) has the wall hung cupboards and pull-out pantry similar to the ones we will have. We'll also have the storage cupboard above the fridge.
Although the kitchen drawers will be handleless, the bi-fold doors will have simple but beautiful brass handles.
This is what I want our booth seat to look like - more panelling and comfy squabs.
I know that's a lot to take in, but what do you think??? I didn't mention the benchtop as we're still trying to decide on this and have several options being priced up at the moment. It may be a long process but I promise to include you on our journey, and can't wait to, one day in the near future (please be near!), reveal the finished rooms.
While most of us are armed with our smart phones, and have hundreds of photos stored on them, how many of us actually get them printed these days? Well, let me tell you about this super cool app, HappyMoose, which makes printing your photos directly from your smart phone easy and lots of fun! The app was developed by Dunedin-based Alex Dong, and he teamed up with Tim Green, who has been in the print industry for 10 years.
This amazing app means you no longer have to load photos onto a USB stick and take them down to a print shop, you can do it all on your phone, from wherever you are. Choose from the range of products - wall dots, canvases, and wood blocks - and within minutes your order will be complete.
I recently gave the HappyMoose app a go so I could tell you exactly how fabulous it is, and I was so impressed! It is really easy to use, you don't have to be a tech whizz at all, the steps are clear and very easy to follow. Once you've selected your product, you then choose your photo straight from your camera roll. You can zoom in and crop and adjust the photo until you're happy with how it looks in the frame. Next you select from a range of sizes and put in your delivery address and payment details - that's it, too easy!
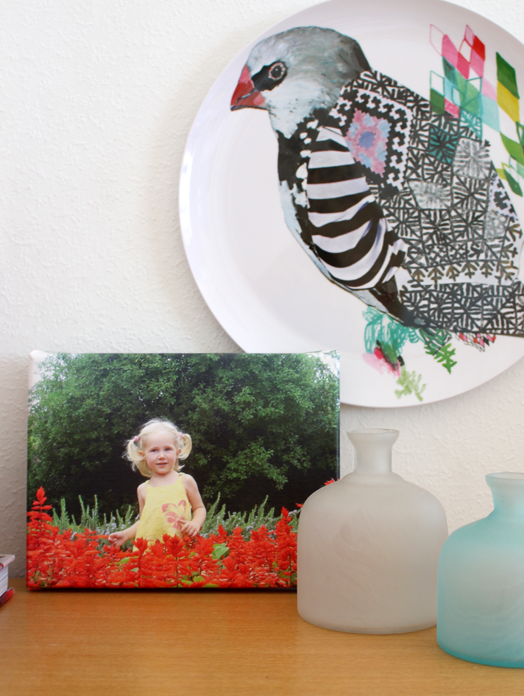
I chose one of each product in the smallest size, and they were delivered to my door within days of ordering. The quality, and the service is fantastic. The canvas is wrapped around a 2cm wooden frame and sprayed with a layer of fine UV resistant varnish for extra protection. The image wraps around the edges so that the canvas looks great from any angle.
The wood block has your photo printed onto the best photographic paper using top quality pigment ink, then pressed firmly onto a solid 18mm thick wood block. The sides and back are painted a smart black.
My canvas and wood block are currently sitting on my desk and my bookshelf, but if I want to hang them on the wall that's no problem. The wood block has an alligator hook on the back for easy hanging, and the canvas comes complete with a sturdy string and two foam dots at the bottom - so there are no contact marks on your wall.
The wall dot might just be my favourite product. My little one featuring my three girls is on the wall next to my desk in the studio, and it makes me smile every time I look at it. It was very easy to apply - I simply peeled the backing paper off and smoothed it onto the wall. You can peel the dot off and reapply without damaging the wall. It's also easy to clean with a damp cloth and the colour will still look great after many washes.
I highly recommend the HappyMoose app and will definitely be using it again. What a fantastic idea for gifts, don't you think?! Why don't you go and try it out for yourself, you can find it in the app store and it's free!
It's been a little while since I featured a home tour on the blog, and they're one of my favourite kinds of posts, so let's start the week with one. This beautiful home in Long Island belongs to a young couple who engaged the services of interior designer, Jenny Norris. Jenny worked with her clients to create a home which reflects their interests and personalities, and also incorporates Jenny's love of travel and photography.
Starting with a blank slate, Jenny uses colour and texture to soften the space, and layers items of intrigue, including lots of beautiful photographs. As it happened the couple honeymooned in one of Jenny's favourite travel destinations, Italy's Amalfi Coast, so she included one of her photo's in their bathroom to remind them of that trip.
When you work with an interior designer, it's their job to capture your personality and reflect it in the space. But you will also, undoubtedly, get a sense of the designer's style, so it's important to know and love their work. Then it will be a match made in heaven.
I had been trying to decide on some seating for my 10 year old twins to use at the desk in their bedroom. Because their room is quite small - long and narrow - I wanted stools that could tuck under the desk when they're not in use, and light enough for the girls to move around easily. In the end I decided on the Hudson Stool from Mocka.
The stools were delivered in no time at all, and were very simple to put together. My little helpers did most of it, I just had to make sure the screws were tight enough.
After becoming avid "Block" fans, my girls like to have lots of input into their room, and they put in a request to have socks painted on their stools. It was a simple enough task that just required some masking tape and a couple of test pots.
Everyone is thrilled with the end result. The simple shape is so endearing and I love the touch of light wood with all the vibrant colour that is already in their room.
Pop over and have a look at the rest of Mocka's range on their website, including another favourite of ours, the Mocka Post Box.


